Friday, July 1, 2016

Getting started with apache Pig, Pig UDF and How to write and execute Pig ,Pig scripts , Grunt shell


What is the Need of Pig?
1.Who don’t know java , then can learn and write Pig script.
2.10 lines of Pig = 200 lines of Java
3.It has built in operations like Join, Group, Filter, Sort and more…
Why we have to go for Pig when we have Map Reduce
1.Because of performance on par with Raw Hadoop
2.Hadoop will take 20 lines of code = 1 line of Pig
3.Hadoop development time is 16 minutes = 1 minute of Pig
Map-Reduce
1.Powerful model for parallelism
2.Based on a rigid procedural structure
3.Provides a good opportunity to parallelize algorithm
Pig
1.It is desirable to have a higher level declarative language.
2.Similar to SQL query where the user specifies “what” and leaves the “how” to the underlying process engine.

Why Pig
1.Java Not Required
2.Can take any type of data like structured or semi structured data.
3.Easy to learn, write and read. Because it is similar to SQL, Reads like series of steps
4.It can extensible by UDF from Java, Python, Ruby and Java script
5.It provides common data operations filters, joins, ordering etc. and nested data types tuples, bags and maps, which is missing in MapReduce.
6.An ad-hoc way of creating and executing map-reduce jobs on very large data sets
7.Open source and actively supported by a community of developers.
Where should we use Pig?
1.Pig is data flow language
2.It is on the top of Hadoop and makes it possible to create complex jobs to process large volumes of data quickly and efficiently
3.It is used in Time Sensitive Data Loads
4.Processing Many Data Sources
5.Analytic Insight Through Sampling.


Where not to use Pig?
1.Really nasty data formats or completely unstructured data(video, audio, raw human-readable text)
2.Perfectly implemented MapReduce code can sometimes execute jobs slightly faster than equally well written Pig code.
3.When we would like more power to optimize our code.
What is Pig?
1.Pig is a open source high level data flow system
2.It provides a simple language queries and data manipulation Pig Latin, that is compiled into map-reduce jobs that are run on Hadoop
Why Is it Important?
1.Companies like Yahoo, Google and Microsoft are collecting enormous data sets in the form of clicks of streams, search logs and web crawls.
2.Some form of ad-hoc processing and analysis of all this information is required.
Where we will use Pig?
1.Processing of Web Logs
2.Data processing for search platforms
3.Support for Ad hoc queries across large datasets.
4.Quick Prototyping of algorithms for processing large data sets.

Conceptual Data flow for Analysis task


How Yahoo uses Pig?
1.Pig is the best suited for the data factory

Data Factory contains
Pipelines:
1.Pipelines bring logs from Yahoo’s web servers
2.These logs are undergo a cleaning steps where boots, company internal views and clicks are removed.
Research:
1.Researchers want to quickly write a script to test theory
2.Pig integration with streaming makes it easy for researchers to take a Perl or Python script and run it against a huge dataset.
Use Case in Health care

1.Take DB Dump in csv format and ingest into HDFS
2.Read CSV file from HDFS using Pig Script
3.De-identify columns based on configurations and store the data back in csv file using Pig script.
4.Store De-identified SCV file into HDFS.
Pig – Basic Program structure.
Script:
1.Pig can run a script file that contains Pig commands
Ex: pig script.pig runs the commands in the file script.pig.
Grunt:
1.Grunt is an interactive shell for running the Pig commands.
2.It is also possible to run Pig scripts from within Grunt using run and exec(execute)
Embedded:
1.Embedded can run Pig programs from Java , much like we can use JDBC to run SQL programs from Java.


Pig Running modes:
1.Local Mode -> pig –x local
2.MapReduce or HDFS mode -> pig
Pig is made up of Two components
1.Pig
a.Pig Latin is used to express Data Flows
2.Execution Environments
a.Distributed execution on a Hadoop Cluster
b.Local execution in a single JVM
Pig Execution
1.Pig resides on User machine
2.Job executes on Hadoop Cluster
3.We no need to install any extra on Hadoop cluster.
Pig Latin Program
1.It is made up of series of operations or transformations that are applied to the input data to produce output.
2.Pig turns the transformations into a series of MapReduce Jobs.

Basic Types of Data Models in Pig

1.Atom
2.Tuple
3.Bag
4.Map
a)Bag is a collection of tuples
b)Tuple is a collection of fields
c)A field is a piece of data
d)A Data Map is a map from keys that are string literals to values that can be any data type.
Example: t= (1,{(2,3),(4,6),(5,7)},[‘apache’:’search’])

How to install Pig and start the pig
1.Down load Pig from apache site
2.Untar the same and place it where ever you want.
3.To start the Pig , type pig in the terminal and it will give you pig grunt shell
Demo:

1.Create directory pig_demo under /home/usr/demo/ mkdir pig_demo
2.Go to /home/usr/demo/pig_demo
3.Create a 2 text files A.txt and B.txt
4.gedit A.txt
add the below type of data in A.txt file.
0,1,2
1,7,8
5.gedit B.txt add the below type of data in B.txt file
0,5,2
1,7,8
6.Now we need to move these 2 files into hdfs
7.Create a directory in HDFS
     Hadoop fs –mkdir /user/pig_demo
8.Copy A.txt and B.txt files into HDFS
     Hadoop fs –put *.txt  /user/pig_demo/
9.Start the pig
    pig –x local

            or 
     pig
 
10.We will get Grunt shell, using grunt shell we will load the data and do the operations the same.
        grunt> a= LOAD ‘/user/pig_demo/A.txt’ using PigStorage(‘,’);
        grunt> b= LOAD ‘/user/pig_demo/B.txt’ using PigStorage(‘,’);
        grunt> dump a;
        // we will load the data and it will display in Pig
        grunt> dump b;
        grunt> c= UNION a,b;
        grunt> dump c;
 
11.We can change the A.txt file data and again we will place it into HDFS using
hadoop fs –put A.txt /user/pig_demo/
And load the data again using grunt shell, then union the a,b files . then combine 2 files using UNION and then dump the C. This is how we can do the load the data instantly.
//If we want split data into column wise 0 column values split into d and e
        grunt> SPLIT c  INTO d IF $0 == 0 , e IF $0 == 1
        grunt> dump d;
        grunt> dump e;
        grunt> lmt = LIMIT c 3;
        grunt> dump lmt;
        grunt> dump c;
        grunt> f= FILTER  c BY  $1 > 3;
        grunt> dump f;
        grunt> g = group c by  $2;
        grunt> dump g;

We can load the data in different format
grunt> a= LOAD ‘/user/pig_demo/A.txt’ using PigStorage(‘,’)  as (int:a1 , int:a2 , int:a3);
grunt> b= LOAD ‘/user/pig_demo/B.txt’ using PigStorage(‘,’)  as (int:b1 , int:b2 , int:b3);
grunt> c= UNION a,b;
grunt> g = group c by  $2;
grunt> f= FILTER  c BY  $1 > 3;
grunt> describe c;
grunt> h= GROUP c ALL;
grunt> i= FOREACH h GENERATE COUNT($1);
grunt> dump h;
grunt> dump i;
grunt> j = COGROUP a BY $2 , b BY $2;
grunt> dump j;
grunt> j = join a by $2 , b by $2;
grunt> dump j;

Pig Latin Relational Operators
1.Loading and storing
a.LOAD- Loads data from the file system or other storage into a relation
b.STORE-Saves a relation to the file system or other storage
c.DUMP-Prints a relation to the console
2.Filtering
a.FILTER- Removes unwanted rows from a relation
b.DISTINCT – Removes duplicate rows from a relation
c.FOREACH .. GENERATE – Adds or removes fields from a relation.
d.STREAM – Transforms a relation using an external program.
3.Grouping and Joining
a.JOIN – Join two or more relations.
b.COGROUP – Groups the data in two or more relations
c.GROUP – Group the data in a single relation
d.CROSS – Creates a Cross product of two or more relations
4.Sorting
a.ORDER – Sorts a relation by one or more fields
b.LIMIT – Limits the size of a relation to the maximum number of tuples.
5.Combining and Splitting
a.UNION – Combines two or more relations into one
b.SPLIT – Splits a relation into two or more relations.

Pig Latins – Nulls
1.In Pig , when a data element is NULL , it means the value is unknown.
2.Pig includes the concept of a data element being NULL.(Data of any type can be NULL)
Pig Latin –File Loaders
1.BinStorage – “binary” storage
2.PigStorage – Loads and stores data that is delimited by something
3.TextLoader – Loads data line by line (delimited by newline character)
4.CSVLoader – Loads CSV files.
5.XMLLoader – Loads XML files.

Joins and COGROUP
1.JOIN and COGROUP operators perform similar functions
2.JOIN creates a flat set of output records while COGROUP creates a nested set of output records.
Diagnostic Operators and UDF Statements
1.Types of Pig Latin Diagnostic Operators
a.DESCRIBE – Print’s a relation schema.
b.EXPLAIN – Prints the logical and physical plans
c.ILLUSTRATE – Shows a sample execution of the logical plan, using a generated subset of the input.
2.Types of Pig Latin UDF Statements
a.REGISTER – Registers a JAR file with the Pig runtime
b.DEFINE-Creates an alias for a UDF, streaming script , or a command specification

    grunt>describe c;
    grunt> explain c;
     grunt> illustrate c;

Pig –UDF(User Defined Function)
1.Pig allows other users to combine existing operators with their own or other’s code via UDF’s
2.Pig itself come with some UDF’s. Few of the UDF’s are large number of standard string –processing, math, and complex-type UDF’s were added.
Pig word count example
1.sudo gedit pig_wordcount.txt

data will be as like this 

hive mapreduce pig Hbase siva raju

// create directory inside HDFS and place this file
hadoop  fs –mkdir /user/pig_demo/pig-wordcount_input
//put pig_wordcount.txt file
hadoop  fs –put  pig_wordcount.txt  /user/pig_demo/pig-wordcount_input/
//list the files inside the mentioned directory
hadoop  fs –ls   /user/pig_demo/pig-wordcount_input/

//load the data into pig
grunt> A = LOAD  ‘/user/pig_demo/pig-wordcount_input/ pig_wordcount.txt’;
grunt> dump A;
grunt> B = FOREACH A generate flatten (TOKENIZE((character)$0)) as word;
grunt> dump B;
grunt> C = Group B by word;
grunt> dump C;
grunt> D =  foreach C generate  group, COUNT(B);
grunt> dump D;
How to write a pig script and execute the same
sudo gedit pig_wordcount_script.pig
//We need to add the below command to the script file.
A = LOAD  ‘/user/pig_demo/pig-wordcount_input/ pig_wordcount.txt’;
B = FOREACH A generate flatten (TOKENIZE((character)$0)) as word;
C = Group B by word;
D =  foreach C generate  group, COUNT(B);
STORE D into ‘/user/pig_demo/pig-wordcount_input/ pig_wordcount_output.txt’;
dump D;
//Once completed then we need to execute the pig script
pig pig_wordcount_script.pig

Create User defined function using java.
1. Open eclipse – create new project – New class-
Import java.io.IOException;
Import org.apache.pig.EvalFunc;
Import org.apache.pig.data.Tuple;
public class ConvertUpperCase extends EvalFunc{
    public String exec(Tuple input)throws IOException{
      If(input == null || input.size()==0){
          return null;
      }
    try{
        String str = (String)input.get(0);
         return str.toUpperCase();
     }
catch(Exception ex){
  throw new IOException(“Caught exception processing row”);
}
     }
}
Once done the coding , then we need to export as jar. Place it where ever you want.

How to Run the jar from through pig script.
1.Create one udf_input.txt file - > sudo gedit udf_input.txt
Siva    raju    1234    bangalore   Hadoop
Sachin    raju    345345    bangalore   data
Sneha    raju    9775    bangalore   Hbase
Navya    raju    6458    bangalore   Hive
2.Create pig_udf_script.pig script - sudo gedit pig_udf_script.pig
3.Create one directory called pig_udf_input
  hadoop  fs –mkdir /user/pig_demo/pig-udf_input
  //put pig_wordcount.txt file
  hadoop  fs –put  udf_input.txt  /user/pig_demo/pig-udf_input/
4.Open the pig_udf_script.pig file
REGISTER /home/usr/pig_demo/ ConvertUpperCase.jar;
A=LOAD  ‘/user/pig_demo/pig-udf_input/ udf_input.txt’ using PigStorage (‘\t’) as (FName:chararray,LName:chararray,MobileNo:chararray,City:chararray,Profession:chararray);
B=FOREACH A generate ConvertUpperCase($0), MobileNo, ConvertUpperCase(Profession), ConvertUpperCase(City);
STORE B INTO ‘‘/user/pig_demo/pig-udf_input/ udf_output.txt’
DUMP B;
Run the UDF script using the following command.
pig pig_udf_script.pig

Friday, June 3, 2016

Getting Started with Spark and word count example using sparkcontext


Step 1: Download Spark DownLoad Spark From Here
1.Choose Spark Release < which ever version you wan to be work>
2.Choose Packe Type < Any version of hadoop>
3.Choose Download type
4.Click on the Download Spark.


Step 2: After successful Download, we need to run the spark.
For that , we need to follow few steps.

1.Install Java 7 and set the PATH and JAVA_HOME in environment variables.
2.Download Hadoop version< Here I have downloaded hadoop 2.4>
3. Untar the tar file and set the HADOOP_HOME and update the PATH in environemnt varaibles.
4.If Hadoop not installed then download the winutils.exe file and save in your local system.
(This is to work with windows environment)
5.After downloading set the HADOOP_HOME in environment variables where our winutils.exe file resides.


Step 3: Once everything has been done, then now we need to check spark has been working or not.
1.Go to command Prompt
C:/>spark-shell

spark will start and with lot of logs, to avoid info logs we need to change the log level.

Step 4: Go to conf inside spark
1.Copy log4j.properties.template and paste in same location and edit the same.
2.Change the INFO level to ERROR level and rename it has log4j.properties
log4j.rootCategory=INFO, console change as
log4j.rootCategory=ERROR, console

Step 5: After changing the Log level, if we try to run spark-shell, again from command prompt, then you can see the difference.
1.This is How we can install the Spark in windows environment.
2.If you are facing any issues while starting the spark.
3.First check the Hadoop home path by using the following command
C:> echo %HADOOP_HOME% 
4.It should print Hadoop home path where our winutils.exe file is available
5.Set the permissions for the hadoop temp folder, provide the permissions
           C:> %HADOOP_HOME%\bin\winutils.exe ls \tmp\hive
           C:> %HADOOP_HOME%\bin\winutils.exe  chmod 777  \tmp\hive


Step 6: Now we will check word count example using spark.
How we usally do in Hadoop Map reduce to count the words in the given file.

1.After spark-shell started we will get 2 contexts, one is Spark Context (sc), SQL Context as sqlContext.
2.Using the spark context sc, we will read the files, and do the manipulation and write output to the file.

          val textFile = sc.textFile(“file:///C:/spark/spark-1.5.0-bin-hadoop2.4/README.md”)

          //to read the first line of the file
          textFile.first

          //Split the each line data using space as delimeter
         val tokenizedFileData = textFile.flatMap(line=>line.split(“ “))

         //Prepare Counts using map
         val countPrep = tokenizedFileData.map(word=>(word,1))

         //Check the counts using reduceByKey
         val  counts = countPrep.reduceByKey((accumValue,newValue)=>accumValue+newValue)

         //sort the values using key value pair
         val  sortedCounts = counts.sortBy(kvPair=>kvPair._2,false)

         //Save the sorted counts into outfile calles ReadMeWordCount
         sortedCounts.saveAsTextFile(file:///C:/spark/ReadMeWordCount)

        //If we want to show countByValue(built in mapreduce)
        tokenizedFileData.countByValue


Step 7: Few more commands to save the output file into local system


Step 8: Output file will be stored as parts as mentioned below


Thank you very much for viewing this post.

Friday, April 29, 2016

Print numbers 1 to 100 , Replace 'A' which number is divisible by 3 and Replace 'B' which number is divisible by 5 and Replace 'AB' which number is divisible by 3 and 5

This post will explain you about how to print numbers from 1 to 100 with following conditions.
1. Replace 'A' which number is divisible by 3
2. Replace 'B' which number is divisible by 5
3. Replace 'AB' which number is divisible by 3 and 5

import java.util.ArrayList;
import java.util.List;


public class TestPrintNumbers {
 
 public static void main(String[] args) {
  List list = new ArrayList();
  String finalResult = new String();
  for(Integer i=1;i<=100;i++){
       if(i%3==0 && i%5==0 ){
          list.add("AB");
       }
       else if(i%3==0){
   list.add("A");
       }
       else if(i%5==0){
          list.add("B");
       }
              else if(i%3 !=0 && i%5!=0){
          list.add(i);
                }
  }
     for (int j = 0; j < list.size(); j++) {
      finalResult = finalResult.concat(list.get(j)+",");
  }
  System.out.print(finalResult.substring(0,finalResult.length()-1));
  
 }

}

Output
1,2,A,4,B,A,7,8,A,B,11,A,13,14,AB,16,17,A,19,B,A,22,23,A,B,26,A,28,29,AB,31,32,A,34,B,A,37,38,A,B,41,A,43,44,AB,46,47,A,49,B,A,52,53,A,B,56,A,58,59,AB,61,62,A,64,B,A,67,68,A,B,71,A,73,74,AB,76,77,A,79,B,A,82,83,A,B,86,A,88,89,AB,91,92,A,94,B,A,97,98,A,B

Sunday, March 27, 2016

Getting started with apache flume, retrieve Twitter tweets data into HDFS using flume


This post will explain you about, flume installation , retrieve tweets to HDFS, Twitter app creation for development.

1.Download latest flume
2.Untar the downloaded tar file in which ever location you want.
sudo tar -xvzf apache-flume-1.6.0-bin.tar.gz
3.Once you have done the above steps, u can start the ssh localhost, if not connected to ssh server
4.Start the dfs ./start-dfs.sh
5.Start the ./start-yarn.sh
6.Go up to bin folder where flume has been extracted
7.Here I am extracted flume under /usr/local/flume-ng/apache-flume-1.6.0-bin
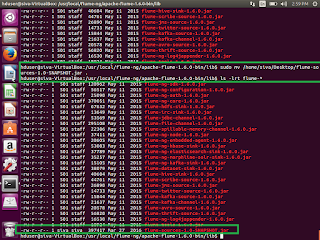
8.First Download the flume-sources-1.0-snapshot.jar and move that jar into inside /usr/local/flume-ng/apache-flume-1.6.0-bin/lib/

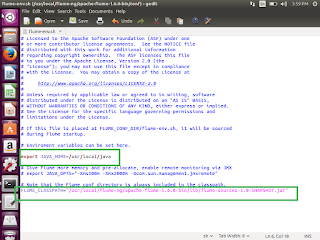
9.Once we have done this, Now we need to set the java path and snapshot.jar path details in flume-env.sh
/usr/local/flume-ng/apache-flume-1.6.0-bin/conf>sudo cp flume-env.sh.template flume-env.sh
   /usr/local/flume-ng/apache-flume-1.6.0-bin/conf> sudo gedit flume-env.sh

10.Now we need to register our application with twitter dev
11.open the twitter , if you are not having sign in details, then please signup the same. Once you have signed up then use the twitter apps

12. Click on Create New App Enter the required details

13. Check the I Agree checkbox

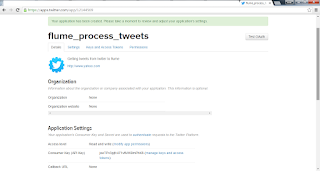
14.Once application has been created then twitter page will be look like this.


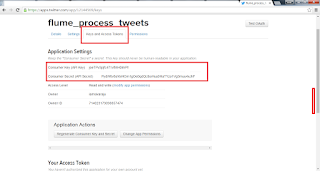
15.Click on the Keys and Access Tokens tab and copy consumer key and consumer secret key and paste any notepad

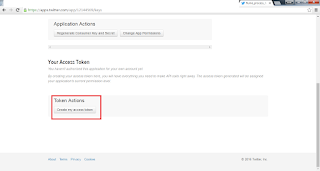
16.Click Create my access token

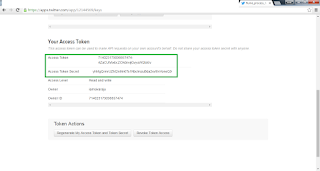
17.It will generate access token and access token secret, copy these 2 values and place it notepad

18.Create flume.conf file under /usr/local/flume-ng/apache-flume-1.6.0-bin/conf and paste the below details.
# Licensed to the Apache Software Foundation (ASF) under one
# or more contributor license agreements.  See the NOTICE file
# distributed with this work for additional information
# regarding copyright ownership.  The ASF licenses this file
# to you under the Apache License, Version 2.0 (the
# "License"); you may not use this file except in compliance
# with the License.  You may obtain a copy of the License at
#
#  http://www.apache.org/licenses/LICENSE-2.0
#
# Unless required by applicable law or agreed to in writing,
# software distributed under the License is distributed on an
# "AS IS" BASIS, WITHOUT WARRANTIES OR CONDITIONS OF ANY
# KIND, either express or implied.  See the License for the
# specific language governing permissions and limitations
# under the License.


# The configuration file needs to define the sources, 
# the channels and the sinks.
# Sources, channels and sinks are defined per agent, 
# in this case called 'TwitterAgent'

TwitterAgent.sources = Twitter
TwitterAgent.channels = MemChannel
TwitterAgent.sinks = HDFS

TwitterAgent.sources.Twitter.type = com.cloudera.flume.source.TwitterSource
TwitterAgent.sources.Twitter.channels = MemChannel
TwitterAgent.sources.Twitter.consumerKey = joeTPv3pjfc471vfMH0lmP
TwitterAgent.sources.Twitter.consumerSecret = PydW6v8aYoiHOm1gOe0qdQUboHua9HaTYzo1Vg3muu4xJhF
TwitterAgent.sources.Twitter.accessToken = 714023179098857474-4ZaCUhAxbcZCKdnvijGvyuWQteEv
TwitterAgent.sources.Twitter.accessTokenSecret = yhMgQrmrUZht2nMn6Ts1NbclmzuBda2xvtIIvVoneQ 
TwitterAgent.sources.Twitter.keywords = hadoop, big data, analytics, bigdata, cloudera, data science, data scientiest, business intelligence, mapreduce, data warehouse, data warehousing, mahout, hbase, nosql, newsql, businessintelligence, cloudcomputing

TwitterAgent.sinks.HDFS.channel = MemChannel
TwitterAgent.sinks.HDFS.type = hdfs
TwitterAgent.sinks.HDFS.hdfs.path = hdfs://localhost:9000/user/flume/tweets/%Y/%m/%d/%H/
TwitterAgent.sinks.HDFS.hdfs.fileType = DataStream
TwitterAgent.sinks.HDFS.hdfs.writeFormat = Text
TwitterAgent.sinks.HDFS.hdfs.batchSize = 1000
TwitterAgent.sinks.HDFS.hdfs.rollSize = 0
TwitterAgent.sinks.HDFS.hdfs.rollCount = 10000

TwitterAgent.channels.MemChannel.type = memory
TwitterAgent.channels.MemChannel.capacity = 10000
TwitterAgent.channels.MemChannel.transactionCapacity = 100

19. Once that is done , then we need to run the twitter agent in flume.
/usr/local/flume-ng/apache-flume-1.6.0-bin>./bin/flume-ng agent -n TwitterAgent -c conf -f /usr/local/apache-flume-1.6.0-bin/conf/flume.conf

20. once it is started , wait for some time and click the ctrl+C and now it's time to see the tweets in HDFS file.
21. Open the browser which is there in unix machine and browse the same. go to /user/flume/tweets and see the tweets
http://localhost:50075
22. we can see data similar as shown in twitter, then the unstructured data has been streamed from twitter on to HDFS successfully. Now we can do analytics on this twitter data using Hive.

This is how we can bring live tweets data into HDFS and we can do the analytics using hive.
Thank you very much for viewing this post


Zookeeper Basics, HBase Zookeeper


This post will explain you basics about Zookeeper.
Why Zookeeper
Zookeeper is coordinating mechanism for HBase.

It is mainly used in cluster environment.
Target market for Zookeeper


Zookeeper Data Model
1. Hierarchal namespace (like File System)
2. Each Z node as data and children
3. Data is read and write in its entity

Zookeeper will provide services like, if any one server failure , then another server will be accessible, without any delay.
Zookeeper will provide
1. Wait free
2. Simple , Robust, Good Performance
3. Turned for Read Dominant Workloads
4. Familiar Models and interfaces
5. Need to be able to wait efficiency
Zookeeper and Hbase
Master failover
Region servers and master discovery via zookeeper
1. HBase clients connect zookeeper to find configuration details
2. Region server and master failure detection.
How HBase and Zookeeper will work?


Master
If more than one master, then they fight
Root Region Server
1. This Z node holds the location of the server hosting the root of all the tables in HBase.
2. A directory in which there is a znode per HBase region server
3. Region servers register themselves with zookeeper when they come online.
On region server failure (detected via ephemeral znodes and notification via zookeeper), the
master splits the edits out per region.

These are the basic details about zookeeper.
Thank you very much for viewing this post.


Saturday, March 26, 2016

Getting started with HBase, HBase Compactions, Load data into HBase Using Sqoop

This post will explain you abou HBase Compactions, how to install HBase and start the Hbase, HBase Basic operations.
How to load data into HBase using sqoop.
HBase Compactions

1. HBase writes out immutable files as data is added
a). Each store consists rowkey-ordered files.
b).Immutable- more files accumulated over time.
2. Compaction rewrite several files into one
a).Lesser files – Faster reads
3. Major compaction rewrites all files in a store into one
a).Can drop deleted records and older versions
4. In a minor compaction, files to compact are selected based on a heuristic.

How to install HBase and start the same.
1. First download latest version HBase from http://www.apache.org/dyn/closer.cgi/hbase/ or https://hbase.apache.org/
2. Once Downloaded, then try to un tar the same.
3. tar –xvzf hbase-1.0.1.1-hadoop1-bin.tar.gz
4. Go to /usr/local/hbase/hbase-1.0.1.1/
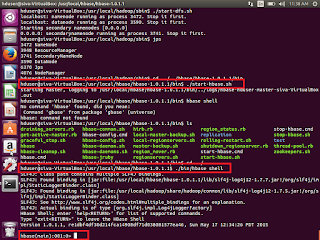
5. ./bin/start-hbase.sh
6. Once it is started , then
7. ./bin/hbase shell


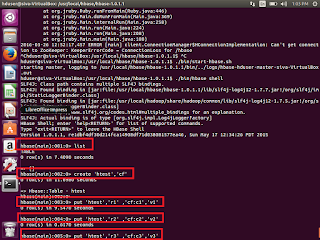
We can see the shell window to work with. Try to enter list. It will show you list of existing tables.
If we are able to execute this command means our hbase started successfully without any issue.
Hbase>list

Now we will see sql operations through HBase.
HBase Basic operations
Create a table syntax
Create ‘table_name’ , ‘column_family’
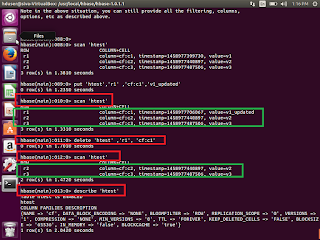
HBase>Create ‘htest’,’cf’
Insert data
put ‘table_name’ ,’row_key1’,’column_family:columnname’,’v1’
Update data

put ‘table_name’ ,’row_key1’,’column_family:columnname’,’v2’


Select few rows
get  ‘table_name’ ,’row_key1’
Select whole table
scan ‘table_name’
Delete particular row value
delete  ‘table_name’ ,’row_key1’,’column_family:columnname’


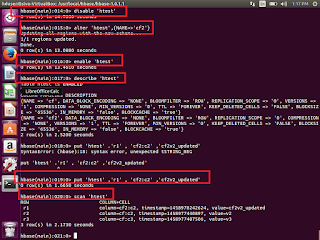
Alter existing table
Before alter the table, first we need to disable the same table
disable ''
alter '' ,{NAME=''}


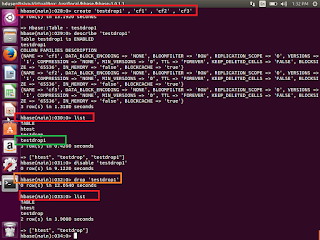
Drop the table
First disable the existing table, which we supposed to be drop
Hbase>Disable  ‘testdrop1’
Hbase>drop  ‘testdrop1’


How to create table from java and insert the data to the same in HBase table ?
First open eclipse-> create a new project ->class->HBaseTest.java
Copy and paste the below code. If any compilation errors then add the respective Hbase jars the same

Public class HBaseTest {
  Public static vaoid main(String args[]) throws  IO Exception{
 //We need Configuration object to tell the client where to connect.
//when we create a HBaseConfiguration , it reads whatever we have set into our hbase-site.xml, and //hbase-default.xml, as long as these can be found in the classpath
    Configuration config = HBaseConfiguration.create();
 //Instantiate HTable  object, that connects the testHBaseTable
//Create a table with name  testHBaseTable,  if it is not available.
   HTable table = new HTable(config,” testHBaseTable”);
//To Add a row use Put, Put constructor takes the name of the row which we want to insert into a //byte array, in HBase , the Bytes class has utility to converting all kinds of java types to byte arrays.
Put p = new Put(“testRow”);

//to set the value to row , we would like to update in the row testRow .
//Specify the column family. Column qualifier and value of the table.
//cell we would like to update then the column family must already exist.
//in our table schema the qualifier can be anything
//All must be specified as byte arrays as hbase is all about byte arrays.
p.add(Bytes.toBytes(“littleFamily”),Bytes.toBytes(“littleQualifier”),Bytes.toBytes(“little Value”));
//Once we have updated all the values for Put instance. Then HTable#put method takes Put instance  //we have building and pushes the change we made into HBase.
table.put(p);
//Now, to retrieve the data which we have just wrote the table;
Get   g = new Get(Bytes.toBytes(“testRow”)
Result   r = table.get(g);
byte [] value = r.getValue(Bytes.toBytes(“littleFamily”),Bytes.toBytes(“littleQualifier”));
String ValueString = Bytes.toString(value);
System.out.println(“GET:”+valueString);
//Some times we don’t know about row name, then we can use the scan to retrieve all the data from //the table
Scan s = new Scan();
s.addColumn(Bytes.toBytes(“littleFamily”), Bytes.toBytes(“littleQualifier”));
ResultScanner scanner = table.getScanner(s);
try{
   for (Result rr = scanner.next();rr!=null;rr=scanner.next()){
    System.out.println(“Found Row record:”+ rr);
  } 
}
finally{
scanner.close();
}
 }
 }


Different ways to load the data into HBase
1. HBase Shell
2. Using Client API
3. Using PIG
4. Using SQOOP

How to load data into HBase using SQOOP?
Sqoop can be used directly import data from RDBMS to HBase.
First we need to install sqoop.
1. Download sqoop http://www.apache.org/dyn/closer.lua/sqoop/1.4.6
2. Untar the Sqoop
tar -xvzf sqoop-1.4.6.bin__hadoop-0.23.tar.gz  
3. Go upto bin. then run the executing below command.
sqoop import
               --connector jdbc:mysql://\
                --username  --password 
                --table
                --hbase-table 
                --column-family 
                --hbase-row-key 
                --hbase-create-table

This is how we will work with HBase.
Thank you very much for viewing this post.

Friday, March 25, 2016

HBase Basics, HBase Architecture, Getting started with No SQL Database HBase, HBase Components

This post will explain you about History of Hbase and HBase Architecture,Basic details about HBase, Different types of No SQL Databases
History of HBase
Started in Google.
GFS -> HDFS
MapReduce-> MapReduce
Big Table -> Apache HBASE

Any SQL system – RDBMS
1. Users data is increasing, then we will implement cache mechanism to improve performance.
2. Cache mechanism also having certain limlits.
3. Remove indexing.
4. Avoiding joins
5. Materialized view .
If we use above, then advantages of RDBMS has gone.
Google also faced same problem, then they started with Big Table.
For faster performance we use HBase.
What ever the features hive will not support like crud operations, we can do with HBase.
If anything need to be updated in real time access ,HBase if very useful.
Ad Targeting in real time is very faster.
What is Common problem with existing data processing with Hadoop or Hive?
1. Huge Data
2. Fast Random Access
3. Structured Data
4. Variable Schema- will support to enhance or increase the column names at runtime, which is RDBMS is not supported.
5. Need of compression
6. Need of Distribution(Shading)
How Traditional System(RDBMS) will solve this?
Case: If we want to design Linkedin database to maintain connections?
There 2 tables
1. Users – id,Name,Sex,age
2. Conenctions- User_id,Connection_id,type
But in case of HBase, we can save all the details about users and connections in same column family.
Characteristics of Probable
1. Distributed Database
2. Sorted Data
3. Sparse Data Store
4. Automatic Sharding.

Sorted Data
Example : How data stored in sorted way?
1. www.abc.com
2. www.ghf.com
3. Mail.abc.com
When ever user try’s to access abc.com , then mail.abc.com will not be returned in case of normal storage.

If we use sorted storage then data will be stored like below.
com.abc.www
com.abc.mail
com.ghf.www

If we store like above, then it is easy to access the same.
Sparse Data store
This is mathematical term. If there is null value for particular column , then it will not store.

No SQL Landscape


1.Each No SQL databases as mentioned above is same, they have developed for their purpose.
2.Dynamo is developed by Amazon and it available in Cloud. We can access the same.
3.Cassandra developed by Facebook and they will be using the same. It is combination of Dynamo and HBase, all the features available in Cassandra.

Any No SQL database will have all the characteristics.
It will satisfy only two property at the same time.

HBase Definition
It is a non -relational (NoSQL)database, which stores data in key value pair and it is also called as hadoop database.
1. It Sparse
2. Distributed
3. Multi –dimensional (table name,column name,timestamp) etc..
4. Sorted Map
5. Consistent

Difference between HBase and RDBMS


When to use HBase


When not to use HBase?
1. When you have only few thousand or millions records then it is not advisable to use HBase.
2. Lacks RDBMS commands, if our database requires sql commands then also not go for Hbase
3. When we have hardware less than 5 Data Nodes when replication factor is less than 3, then no need of HBase. It will overhead for system

HBase can run in local system –but this should be considered for a development configuration.
How face book uses HBase as their Message System

1.facebook monitored their usage and figured our what they really needed.
What they needed was a system that could handle two types of data pattern
1. A short set of temporal data that tends to be volatile
2. An ever growing set of data that can be accessed rarely.

1. Real Time
2. Key Value
3. Linearly
4. Big Data
5. Column oriented
6. Distributed
7. Robust
8. Scalable
9. Open source
These are the characteristics of HBase.
HBase is using not only facebook.But also twitter,yahoo etc… they will use to process their large volume data.

Major components of HBase
1. The HBase Master
It will store all the Hbase table and it will coordinate
2. The HRegion server
Actual data will be stored in this server
3. The HBase Client
We will interact to do the crud operations and processing the data

It is same like name node in HDFS
How data distribution will happen in HBase?
We are having data rows from  A to Z
     Rows                                               Servers
    A1,A2 –                Region  Null - A3                  Region server1
    B2,B3,B23,B43-         Region  B2 – B43                   Region server2      
    K1,K2,Z30 -            Region K1 – Z30                    Region server3


How HBase will write data to the file?

1.Every HBase requires confirmation from both Write Ahead Log (WAL) and the MemStore.
2.The two steps ensures that every write to HBase happens as fast as possible while maintaining durability.
3.The Memstore is flushed to a new HFile when it fills up.
4.Usally Memstore default size 256MB, once it is filled up then , it move that information to HFile it's default size is 64 KB.
5.It will be act as a immutable object.
HBase Read File
1.Data is reconciled from the block cache, The Mem-Store and the HFiles to give the client an up to date view of the rows which client requested for.
2.HFiles contain a snapshot of the Memstore at the point when it was flushed. Data for a complete row can be stored across multiple HFiles.
3. In order to read complete row, HBase must read across all HFiles that might contain information for that row in order to compose the complete record.


HFile Compaction

All HFiles will be compacted and put as Compacted HFile.
HBase Components
1. Region – a range of rows stored together
2. Region servers- serves one or more regions
a. A region served by only one region server
3. Master Server – Daemon responsible for managing HBase cluster.
4. HBase stores its data into HDFS- Relies on HDFS’s High availability and fault tolerance.
HBase Architecture

This architecture will explain you about how Hbase will work.

This is Basics about HBase. My next post you can see How to install and work with HBase.
Thank you very much for viewing this post.


Thursday, March 24, 2016

Hive Dynamic , Static Partitions,User defined functions(UDF) with Java

This post is having more advanced concepts in Hive like Dynamic Partition, Static Partition, custom map reduce script, hive UDF using java and python.

Configuring Hive to allow partitions
A query across all partitions can trigger with an enormous Map Reduce Job, if the table data and number of partitions are large. A highly suggested safety measure is putting Hive into strict mode, which prohibits queries of a partitioned table without a WHERE clause that filters the partitions.
We can set the mode to nonstrict, as in the following session.

Dynamic Partitioning –configuration

Hive> set hive.exec.dynamic.partition.mode=nonstrict;
Hive> set hive.exec.dynamic.partition=true;
Hive> set hive.enforce.bucketing=true;

Once we have configured, Then we will see how we will create a dynamic partition
Example:
Source table:
1. Hive> create table transaction_records(txnno INT,txndate STRING,custno INT,amount DOUBLE,category STRING, product STRING,City STRING,State String,Spendby String )row format delimited fields terminated by ‘,’ stored as textfile;
Create Partitioned table:
1.  Hive> create table transaction_recordsByCat(txnno INT,txndate STRING,custno INT,amount DOUBLE, product STRING,City STRING,State String,Spendby String )
Partitioned by (category STRING)
Clustered by(state) INTO 10 buckets 
row format delimited fields terminated by ‘,’ stored as textfile;


In the above partitioned query we are portioning table depending on the category and bucketing by 10 that means it will create 0-9 buckets and assign the hash value the same.

Column category no need to provide in table structure , Since we are creating partition based on the category


Insert existing table data into newly created partition table.
Hive>from transaction_records txn  INSERT OVERWRITE TABLE table transaction_recordsByCat PARTITION(category) select txn.txnno ,txn.txndate,txn.custno,txn.amount,
txn. product,txn.City,txn.State,txn.Spendby ,txn.category DISTRIBUTE BY category;
Static partition
If we get data every month to process the same, we can use the static partition
Hive> create table logmessage(name string,id int) partitioned by (year int,month int) row format delimited fileds terminated by ‘\t’;
How to insert data for static partition table?

Hive>alter table logmessage add partition(year=2014,month=2);

Custom Map Reduce script using Hive

Hive QL allows traditional map/reduce programmers to be able to plug I their custom mappers and reducers to do more sophisticated analysis that may not be supported by the built-in capabilities of the language.


Sample data scenario
We are having movie data, different users will give different ratings for same movie or different movies.

user_movie_data.txt file having data like belowuserid,rating,unixtime
1      1       134564324567
2      3       134564324567
3      1       134564324567
4      2       134564324567
5      2       134564324567
6      1       134564324567

Now with above data, we need to create a table called u_movie_data,then we will load the data to the same.

Hive>CREATE TABLE u_movie_data(userid INT,rating INT,unixtime STRING) ROW FORMATED DELIMITED FIELDS TERMINATED BY ‘\t’ STROED AS TEXTFILE;
Hive> LOAD DATA LOCAL INPATH ‘/usr/local/hive_demo/user_movie_data.txt’ OVERWRITE INTO TABLE u_movie_data;

We can use any logic which will be converted unix time into weekday, any custom integration. Here we used python script.
Import sys
Import datetime
for line in sys.stdin:
          line = line.strip()
         userid,movieid,rating,unixtime=line.split(‘\t’)
        weekday = datetime.datetime.fromtimestamp(float(unixtime)).isoweekday()
      print ‘\t’.join([userid,movieid,rating,str(weekday)])

How we will execute python script in hive, first add the file into Hive shell?

Hive> add FILE /usr/local/hive_demo/weekday_mapper.py;

Now load the data into table, we need to do TRANSFORM

INSERT OVERWRITE TABLE u_movie_data_new
       SELECT  TRANSFORM(userid,movieid,rating,unixtime)
      USING ‘python weekday_mapper.py’ 
      AS (userid,movieid,rating,weekday) from u_movie_data;


Hive QL- User-defined function
1.Suppose we have 2 columns – 1 is id of type string and another one is unixtimestamp of type String.
Create a data set with 2 columns(udf_input.txt) and place it inside /usr/local/hive_demo/

one,1456432145676
       two, 1456432145676
       three, 1456432145676
       four, 1456432145676
       five, 1456432145676
       six, 1456432145676
Now we can create a table and load the data the same.
create table udf_testing (id string,unixtimestamp string)
              Row format delimited fields terminated by ‘,’;
   Hive>  load data local inpath ‘/usr/local/hive_demo/udf_input.txt’
   Hive>select * from udf_testing;
Now we will write User defined function using java to get more meaningful date and time format.

Open eclipse->create new java project and New class- add the below code inside java class.
Add the jars from hive location.
Import java.util.Date;
Import java.text.DateFormat;
Import org.apache.hadoop.hive.ql.exec.UDF;
Import org.apache.hadoop.io.Text;
public class UnixTimeToDate extends UDF {
    public Text evaluate(Text text){
     if(text==null) return null;
        long timestamp = Long.parseLong(text.toString());
        return new Text(toDate(timestamp));
   }
private String toDate(long timestamp){
   Date date = new Date(timestamp*1000);
   Return DateFormat.getInstance().format(date).toString();
}
}   

Once created, then export jar file as unixtime_to_java_date.jar
Now we need to execute jar file from Hive
1. We need to add the jar file in hive shell
Hive>add JAR /usr/local/hive_demo/ unixtime_to_java_date.jar;
      Hive>create temporary FUNCTION  userdate  AS  ‘UnixTimeToDate’;
      Hive> select id,userdate(unixtimestamp) from udf_testing;

This is how we will work with hive. Hope you like this post.
Thank you for viewing this post.

Monday, March 21, 2016

Apache Hive Advanced topics

This post will describe more concepts in Hive
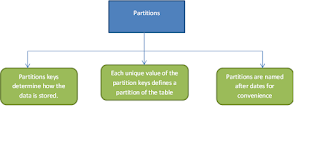
Partitions:
1. How data is stored in HDFS
2. Grouping databases on some column
3. Can have one or more columns.
How partitioning will work?
Usually tables data will be stored in HDFS like below
/user/hive/warehouse//

If we know how data is coming from source of the file , If we implement filter condition using where condition
Then we will do the partitioning for the given data like below

/user/hive/warehouse///month-jan/ /user/hive/warehouse///month-feb/ /user/hive/warehouse///month-march/ /user/hive/warehouse///month-april/ Bucketing is used to improve the performance. What do we mean by Partitions? 1. Partitions means dividing a table into a coarse grained parts based on the value of a particular column such as date. 2. This make it faster to do queries on slices of the data.
Buckets or Clusters 1. Partitions divided further into buckets bases on some other column 2. Use for data sampling. Buckets:  1. Buckets give more extra structure to the data , that may be used for efficient queries.  2. A Join of two tables that are bucketed on the same columns – including the join column can be implemented as a Map Side Join.(Depending on hash value.)  3. Bucketing by user id means, we can easily and quickly evaluate a user based query by running it on a randomized sample of the total set of users. Now we will see how to work partition and bucketing 1. First create a table called transaction_records 2. For that, first create a database called retail Command: to create database
Hive> create database retail;
Command: to use database
Hive> use retail;
Now we need to create a table.
Hive> create table transaction_records(txnno INT,txndate STRING,custno INT,amount DOUBLE,category STRING, product STRING,City STRING,State String,Spendby String )
row format delimited fields terminated by ‘,’ stored as textfile;
How to load data into table?
Hive>  LOAD  DATA  LOCAL INPATH  ‘/usr/local/hive_demo/transaction/’  INTO  TABLE transaction_records;
Hive> select count(*) from transaction_records;
We can try different queries as like SQL. Ex: Aggregation: 1. select category,sum(amount) from transaction_records group by category; Grouping: 2. distinct(select (DISTINCT category ) from transaction_records; How to copy table data into another table or file or HDFS? 1. Insert output into another table
Insert overwite table results(select * from transaction_records);
 Create table results as select * from transaction_records;
2. Insert Output into local file.
Insert overwrite local directory ‘results’ select * from transaction_records;
3. Inserting output into HDFS
Insert overwrite directory  ‘/results’ select * from transaction_records;
How to write all queries in a single script file and execute the same? Hive Scripts are used to execute a set of Hive Commands collectively. This helps in reducing the time and effort invested in writing and executing each command manually. Hive support scripting from Hive 0.10.0 and above versions. Name file as hive_script.hql and place it where ever you like( here I keeping inside /usr/local/hive_demo/
use retail;
 create table transaction_records_script(txnno INT,txndate STRING,custno INT,amount DOUBLE,category STRING, product STRING,City STRING,State String,Spendby String )
row format delimited fields terminated by ‘,’ stored as textfile;
 LOAD  DATA  LOCAL INPATH  ‘/usr/local/hive_demo/transaction/’  INTO  TABLE transaction_records_ script;
Select count(*) from  transaction_records_ script;
select category,sum(amount) from  transaction_records group by category;
How to Run the hive script file. hive -f hive_script.hql OR hive -f hive_script.sql (if we named our script file as .sql then we can use this.) Hive Joins (table joining) Create a script to create tables called employee and email Before creating script we need to create 2 files(emp.txt,email.txt) and need to filled with data /usr/local/hive_demo/emp.txt
siva,56000,bangalore
raju,67000,chennai
arjun,25000,mumbai
sweety,54000,pune
/usr/local/hive_demo/email.txt
siva,siva@gmail.com
raju,raju@yahoo.com
arjun,arjun@aol.com
sweety,sweety@rediff.com
jatin,jatin@gmail.com
sneha,sneha@hotmail.com
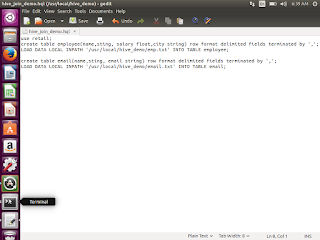
Create a script to work with joining tables demo
Use retail;
Create table employee(name string,salary float,city string) row format delimited fields terminated  by ‘,’ ;
Load data local INPATH ‘/usr/local/hive_demo/emp.txt’ into table employee;
Create table email(name string,email string) row format delimited fields terminated by ‘,’;
Load data local inpath ‘/usr/local/hive_demo/email.txt’ into table email;
After creating the script now we need to run the hive_join_demo.hql file. hive -f hive_join_demo.hql Now we will work with joins: Inner join
Hive> select a.name,a.city,a.salary,b.email_id  from employee a  join email b on a.name=b.name;
It will display name,city ,salary and email id where matching condition between two tables; Left outer join
Hive> select a.name,a.city,a.salary,b.email_id  from employee a  LEFT OUTER join email b on a.name=b.name;
It will display all the records from first table and matching records from second table. Right outer join
Hive>select a.name,a.city,a.salary,b.email_id  from employee a  RIGHT OUTER join email b on a.name=b.name;
It will display all the records from second table and matching records from first table.


This is how we will work with hive sql joins.
Thank you very much for viewing this.

Monday, March 7, 2016

Getting started with Apache Hive


This post will explain below points.
1. How to install and configure Hive on Ubuntu.
2. How to create a table using HIVE.
3. How to load local data and HDFS external data.
4. Basic SQL commands usage in Hive

Step 1: Download latest hive tar file from the below link
https://hive.apache.org/downloads.html
Command: untar the file using below command
/usr/local> tar –xvzf  /usr/local/ 

Step 2: Once tar has been completed. Then we need to do some configurations to start the HIVE.

Command:to edit the bashrc file
sudo gedit  ~/.bashrc 
Step 3: Add the below configuration detail in bashrc file
       export  HIVE_HOME=”/usr/local/ apache-hive-1.2.1-bin”
       export PATH= $PATH:$HIVE_HOME/bin
      export HADOOP_USER_CLASSPATH_TEST=true
     export PATH
   

Step 4: to avoid [ERROR] Terminal initialization failed; falling back to unsupported java.lang.IncompatibleClassChangeError: Found class jline.Terminal, but interface was expected at jline , below ling of configuration will help.
export HADOOP_USER_CLASSPATH_TEST=true 
Step 5: We need to add configuration in hive-config.sh file.
Command : To add the hadoop home configuration in hive-config.sh
       cd  /usr/local/apache-hive-1.2.1-bin/bin
       sudo gedit hive-config.sh
     
Add the below configuration in hive-config.sh
       export HADOOP_HOME=/usr/local/hadoop
     
Step 6: Once above configurations completed then we need to start the hive

use hive keyword in terminal, then it will open the hive shell for you.


Step 7: This is how we will install and configure HIVE.
Now we are ready to work with HIVE.

Step 8: To know the databases available in hive?
Hive>show databases;
Step 9: To know the tables, which is available in hive?
Hive> show tables;
Step 10: How to create database in Hive?
Hive> create database cricket;
Step 11: How to use created database?
Hive> use cricket;
Step 12: How to create a table inside cricket database
       Hive> create table matchscore(
                                          match_name string,
                                          match_score int,
                                         match_location string
                                      ) row format delimited fields terminated by  ‘,’  ;


Now we have created database successfully. We need to verify whether database created or not.

open another terminal and go up to /user/local>


Step 13: How to Know the database created or not?
$usr/local> hadoop fs –ls /user/hive/warehouse

Step 14: How to Know the database table created or not?

$usr/local> hadoop fs –ls /user/hive/warehouse/cricket.db
Now we have created database and table successfully and verified the same.
We need to insert the data into respective tables.
Now How we will load the data into hive tables.

first create a file in local directory inside /usr/local/hive_demo , If hive_demo dir is not there then create the same.
Step 15: How to create file?
$usr/local/hive_demo> sudo gedit matchinfo.txt

Once we created this file, then we need to load the same into hive table, Go to HIVE shell

Step 16: How to load the data from local system to Hive table

    Hive> LOAD DATA  LOCAL INPATH  ‘/usr/local/hive_demo/matchinfo.txt’  INTO  TABLE matchscore;

Once we have loaded the file, if we want to check ,whether the file has been created inside respective database table or not
Go to terminal /usr/local
Step 17: How to check table data loaded into respective table or not?
$usr/local> hadoop fs –ls /user/hive/warehouse/cricket.db/matchscore

Step 18: How to verify the data has been loaded into Hive table or not
Hive>select * from matchscore;

This is how we will load the local data into Hive tables.
Now we need to check how will load HDFS data into HIVE tables
We can edit the existing file and add the more details to the matchinfo_details.txt file

Step 19: Create HDFS directory
$usr/local> hadoop fs –mkdir -p /usr/local/hive_demo/input

Step 20 :How to put a file in HDFS?

$usr/local>hadoop fs –put /usr/local/hive_demo/ matchinfo_details.txt /usr/local/hive_demo/input/

Now we have created hdfs directory and added the file into HDFS directory.
Step 21: How we will load data into Hive tables?
    Hive> create EXTERNAL table matchscore_result(
                                                      match_name string,
                                                       match_score int,
                                                        match_location string,
                                                       match_result    string)
                              row  format delimited fields terminated by  ‘,’
                               LOCATION ‘/usr/local/hive_demo/input’;


We have successfully loaded the external file data into Hive table.
to check the table data use the select * from matchscore_result from the Hive shell.
Advantage with this external loading is , if we modified the existing file and, again we have kept the updated file into HDFS,
then no need to load the data again into hive, simply we can use select * from matchscore_result. We will get the updated results.

Step 22: How to describe the table structure?
Hive> describe formatted matchscore;

Step 23: How to rename the existing table?
Hive> alter table matchscore rename to matchscore_altered;

Step 24: How to show the updated table list?
Hive> show tables;

This is how we can install and work with Hive basics.
Thank you for viewing this post.

Sunday, February 28, 2016

Apache Hive Basics


Hive Back ground

1. Hive Started at Facebook.
2. Data was collected by cron jobs every night into Oracle DB.
3. ETL via hand-coded python
4. Grew from 10s of GBs(2006) to 1TB/day new data in 2007 , now 10x that

Facebook usecase
1. Facebook uses more than 1000 million users
2. Data is more than 500 TB per day
3. More than 80k queries for day
4. More than 500 million photos per day.

5. Traditional RDBS will not the right solution, to do the above activities.
6. Hadoop Map Reduce is the one to solve this.
7. But Facebook developers having lack of java knowledge to code in Java.
8. They know only SQL well.
So They introduced Hive
Hive
1. Tables can be partitioned and bucketed.
Partitioned and bucketed are used for performance
2. Schema flexibility and evolution
3. Easy to plugin custom mapper reducer code
4. JDBC/ODBC Drivers are available.
5. Hive tables can be directly defined on HDFS
6. Extensible : Types , formats, Functions and scripts.
What do we mean by Hive
1. Data warehousing package built on top of hadoop.
2. Used for Data Analytics
3. Targeted for users comfortable with SQL.
4. It is same as SQL , and it will be called as HiveQL.
5. It is used for managing and querying for structured data.
6. It will hide the complexity of Hadoop
7. No need to learn java and Hadoop API’s
8. Developed by Facebook and contributed to community.
9. Facebook analyse Tera bytes of data using Hive.

Hive Can be defined as below
• Hive Defines SQL like Query language called QL
• Data warehouse infrastructure
• Allows programmers to plugin custom mappers and reducers.
• Provides tools to enable easy to data ETL
Where to use Hive or Hive Applications?
1. Log processing
2. Data Mining
3. Document Indexing
4. Customer facing business intelligence
5. Predective Modeling and hypothesis testing
Why we go for Hive
1. It is SQL like types and if we provide explicit schema and types.
2. By using Hive we can partition the data
3. It has own Thrift sever, we can access data from other places.
4. Hive will support serialization and deserialization
5. DFS access can be accessed implicitly.
6. It supports Joining , Ordering and Sorting
7. It will support own Shell hive script
8. It is having web interface
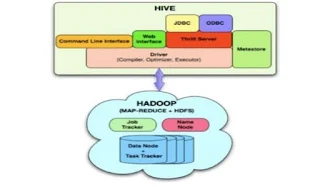
Hive Architecture


1. Hive data will be stored in Hadoop File System.
2. All Hive meta data like schema name, table structure,view name all the details will be stored in Metastore
3. We will Hive Driver, it will take the request and compile and convert into hadoop understanding language and execute the same.
4. Thrift server is will access hive and fetch data from DFS.

Hive Components


Hive Limitations
1. Not designed for online transaction processing.
2. Does not offer real time queries and row level updates
3. Latency for Hive query’s is high(It will take minutes to process)
4. Provides acceptable latency for interactive data browsing
5. It is not suitable for OLTP type applications.
Hive Query Language Abilities


What is the traditional RDBMS and Hive differences
1. Hive will not verify the data when it is loaded, but it is do at the time of query issued.
2. Schema on read makes very fast initial load. The file operation is just a file copy or move.
3. No updates , Transactions and indexes.
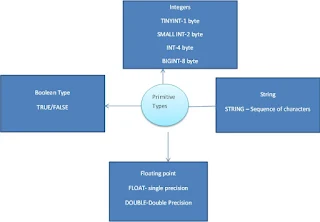
Hive support data types


Hive Complex types:
Complex types can be built up from primitive types and other composite types using the below operators.

Operators
1. Structs: It can be accessed using DOT(.) notation
2. Maps: (Kye-value tuples), it can be accessed using [element-name] as notation
3. Arrays: (Indexable lists) Elements can be accessed using the [n] notation, where n is an index (zero –based) into the array.
Hive Data Models
1. Data Bases
Namespaces – ex: finance and inventory database having Employee table 2 different databases
2. Tables
Schema in namespaces
3. Partitions
How data is stored in HDFS
Grouping databases on some columns
Can have one or more columns
4. Buckets and Clusters
Partitions divided further into buckets on some other column
Use for data sampling

Hive Data in the order of granularity


Buckets
Buckets give extra structure to the data that may be used for more efficient queries
A join of two tables that are bucketed on the same columns – including the join column can be implemented as Map Side Join
Bucketing by user ID means we can quickly evaluate a user based query by running it on a randomized sample of the total set of users.


These are the basics about Hive.

Thank you for viewing the post.

AddToAny

Contact Form

Name

Email *

Message *