This post will expain you about
1. How we will integrate spring boot and swagger api
2. Spring boot with JPA and MySQL (Crud Repository and NamedJdbcTemplate)
3 Spring mockMvc test for controller
4. Integration test for Service and DAO classes
5. Usage of Mockito
6. Sonarqube Code coverage
Step 1 : create a maven project called - springboot-jpa-swagger-mysql-sonarqube in eclipse
Step 2 : provide groupId,artifactId,version,jar,name and description
Step 3: Replace below pom.xml into your local system
pom.xml will have dependencies related to spring boot,swagger,jdbc,mysql,mockito,sonarqube
 4.0.0

 com.siva.springboot.javaguruonline
 springboot-jpa-swagger-mysql-sonarqube
 0.0.1-SNAPSHOT
 jar

 springboot-jpa-swagger-mysql-sonarqube
 Demo project for Spring Boot PJA MySQL AND Sonarqube


  org.springframework.boot
  spring-boot-starter-parent
  2.0.5.RELEASE


  UTF-8
  UTF-8
  1.8


   org.springframework.boot
   spring-boot-starter-data-jpa


   org.springframework.boot
   spring-boot-starter-web


   org.springframework.boot
   spring-boot-starter-test
   test


   mysql
   mysql-connector-java
   runtime


   io.springfox
   springfox-swagger2
   2.8.0


   io.springfox
   springfox-swagger-ui
   2.8.0


   io.springfox
   springfox-bean-validators
   2.8.0


   javax.xml
   jaxb-api
   2.1


   org.projectlombok
   lombok
   1.18.12
   provided


   org.sonarsource.scanner.maven
   sonar-maven-plugin
   3.0.2


    org.springframework.boot
    spring-boot-maven-plugin


    org.codehaus.mojo
    sonar-maven-plugin
    3.0.2


    org.jacoco
    jacoco-maven-plugin
    0.8.0


      default-prepare-agent

       prepare-agent


      default-report
      prepare-package

       report
Step 4: Now create a Springboot application, which is the starting point to run the Application.
Step 5: create
appliaction.properties under resources folder, add the db related details
## Spring DATASOURCE (DataSourceAutoConfiguration & DataSourceProperties)
spring.datasource.url = jdbc:mysql://localhost:3306/employee
spring.datasource.username = root
spring.datasource.password = root


## Hibernate Properties
# The SQL dialect makes Hibernate generate better SQL for the chosen database
spring.jpa.properties.hibernate.dialect = org.hibernate.dialect.MySQL5InnoDBDialect

# Hibernate ddl auto (create, create-drop, validate, update)
spring.jpa.hibernate.ddl-auto = update

logging.level.root = DEBUG

spring.main.banner-mode=off
spring.datasource.platform=h2
Step 5: Create a SwaggerConfig class, which will have the details , what is controller package and other details
Learn more about Swagger API
swagger-ui
package com.siva.springboot.javaguruonline.config;

import org.springframework.context.annotation.Bean;
import org.springframework.context.annotation.Configuration;

import springfox.documentation.builders.ApiInfoBuilder;
import springfox.documentation.builders.PathSelectors;
import springfox.documentation.builders.RequestHandlerSelectors;
import springfox.documentation.service.ApiInfo;
import springfox.documentation.service.Contact;
import springfox.documentation.spi.DocumentationType;
import springfox.documentation.spring.web.plugins.Docket;
import springfox.documentation.swagger2.annotations.EnableSwagger2;

@Configuration
@EnableSwagger2
public class Swagger2Config {
 @Bean
 public Docket api() {
  return new Docket(DocumentationType.SWAGGER_2).select()
    .apis(RequestHandlerSelectors
      .basePackage("com.siva.springboot.javaguruonline.controller"))
    .paths(PathSelectors.regex("/.*"))
    .build().apiInfo(apiEndPointsInfo());
 }

 private ApiInfo apiEndPointsInfo() {

  return new ApiInfoBuilder().title("Spring Boot REST API")
    .description("Employee Management REST API")
    .contact(new Contact("Siva Raju", "http://www.javaguruonline.com", "siva82k@gmail.com"))
    .license("Apache 2.0")
    .licenseUrl("http://www.apache.org/licenses/LICENSE-2.0.html")
    .version("1.0.0")
    .build();
 }
}
Step 6 : This project is related to employee management system - like Employee CRUD operations
Step 7 : Write Model class called Employee and EmployeeDetails
package com.siva.springboot.javaguruonline.model;

import java.io.Serializable;

import javax.persistence.Column;
import javax.persistence.Entity;
import javax.persistence.GeneratedValue;
import javax.persistence.GenerationType;
import javax.persistence.Id;
import javax.persistence.Table;

import io.swagger.annotations.ApiModel;
import io.swagger.annotations.ApiModelProperty;
import lombok.EqualsAndHashCode;
import lombok.ToString;

@Entity
@Table(name = "employee")
@ApiModel(description="All details about the Employee. ")
@ToString
@EqualsAndHashCode
public class Employee implements Serializable{

 /**
  *
  */
 private static final long serialVersionUID = 7407317371057056536L;

 @ApiModelProperty(notes = "The database generated employee ID")
 private int id;

 @ApiModelProperty(notes = "The employee name")
 private String name;

 @ApiModelProperty(notes = "The employee age")
 private int age;

 public Employee() {

 }

 public Employee(String name, int age) {
  this.name = name;
  this.age = age;
 }

 @Id
 @GeneratedValue(strategy = GenerationType.AUTO)
 @Column(name = "emp_id", nullable = false)
 public int getId() {
  return id;
 }

 public void setId(int id) {
  this.id = id;
 }

 @Column(name = "emp_name", nullable = false)
 public String getName() {
  return name;
 }

 public void setName(String name) {
  this.name = name;
 }
 @Column(name = "email_age", nullable = false)
 public int getAge() {
  return age;
 }

 public void setAge(int age) {
  this.age = age;
 }

}
package com.siva.springboot.javaguruonline.model;

import lombok.EqualsAndHashCode;
import lombok.ToString;

@ToString
@EqualsAndHashCode
public class EmployeeDetails {

 private int empId;
 public int getEmpId() {
  return empId;
 }
 public void setEmpId(int empId) {
  this.empId = empId;
 }
 public String getEmpName() {
  return empName;
 }
 public void setEmpName(String empName) {
  this.empName = empName;
 }
 private String empName;

}
Step 8: Step 8: service/serviceimpl and repository classes
In the repository class, It is extending the
JpaRepository, which will get all the default methods related to that Model Object.
In the DAO class,
NamedParameterJdbcTemplate , to work with native query and how to map using rowmapper
package com.siva.springboot.javaguruonline.repository;

import java.util.List;

import com.siva.springboot.javaguruonline.model.EmployeeDetails;

public interface EmployeeDao {

 public List getEmployeeDetails();


}
package com.siva.springboot.javaguruonline.repository;

import java.util.List;

import org.springframework.beans.factory.annotation.Autowired;
import org.springframework.jdbc.core.namedparam.NamedParameterJdbcTemplate;
import org.springframework.stereotype.Repository;

import com.siva.springboot.javaguruonline.mapper.EmployeeDetailsMapper;
import com.siva.springboot.javaguruonline.model.EmployeeDetails;

@Repository
public class EmployeeDaoImpl implements EmployeeDao{
 String sqlQuery="select emp_id,emp_name from employee";
 @Autowired
 private NamedParameterJdbcTemplate namedParameterJdbcTemplate;

 @Override
 public List getEmployeeDetails() {
  return namedParameterJdbcTemplate.query(sqlQuery, new EmployeeDetailsMapper());
 }

}
package com.siva.springboot.javaguruonline.mapper;

import java.sql.ResultSet;
import java.sql.SQLException;

import org.springframework.jdbc.core.RowMapper;

import com.siva.springboot.javaguruonline.model.EmployeeDetails;

public class EmployeeDetailsMapper implements RowMapper {
 @Override
 public EmployeeDetails mapRow(ResultSet resultset, int count) throws SQLException {
  EmployeeDetails employeeDetails = new EmployeeDetails();
  employeeDetails.setEmpId(resultset.getInt("emp_id"));
  employeeDetails.setEmpName(resultset.getString("emp_name"));
  return employeeDetails;
 }


}
package com.siva.springboot.javaguruonline.repository;

import org.springframework.data.jpa.repository.JpaRepository;
import org.springframework.stereotype.Repository;

import com.siva.springboot.javaguruonline.model.Employee;

@Repository
public interface EmployeeRepository extends JpaRepository{

}
Step 9: Write Controller class, which will have the all the crud operations
package com.siva.springboot.javaguruonline.controller;

import java.util.HashMap;
import java.util.List;
import java.util.Map;

import javax.validation.Valid;

import org.springframework.beans.factory.annotation.Autowired;
import org.springframework.http.ResponseEntity;
import org.springframework.web.bind.annotation.DeleteMapping;
import org.springframework.web.bind.annotation.GetMapping;
import org.springframework.web.bind.annotation.PathVariable;
import org.springframework.web.bind.annotation.PostMapping;
import org.springframework.web.bind.annotation.PutMapping;
import org.springframework.web.bind.annotation.RequestBody;
import org.springframework.web.bind.annotation.RequestMapping;
import org.springframework.web.bind.annotation.RestController;

import com.siva.springboot.javaguruonline.exception.ResourceNotFoundException;
import com.siva.springboot.javaguruonline.model.Employee;
import com.siva.springboot.javaguruonline.model.EmployeeDetails;
import com.siva.springboot.javaguruonline.repository.EmployeeDao;
import com.siva.springboot.javaguruonline.repository.EmployeeRepository;

import io.swagger.annotations.Api;
import io.swagger.annotations.ApiOperation;
import io.swagger.annotations.ApiParam;
import io.swagger.annotations.ApiResponse;
import io.swagger.annotations.ApiResponses;


@RestController
@RequestMapping("/api/v1")
@Api(value="Employee Management System")
public class EmployeeController {
 private static final String EMPLOYEE_NOT_FOUND_FOR_THIS_ID = "Employee not found for this id :: ";

 @Autowired
 private EmployeeRepository employeeRepository;

 @Autowired
 private EmployeeDao employeeDao;

 @ApiOperation(value = "View a list of available employees", response = List.class)
 @ApiResponses(value = { @ApiResponse(code = 200, message = "Successfully retrieved list"),
   @ApiResponse(code = 401, message = "You are not authorized to view the resource"),
   @ApiResponse(code = 403, message = "Accessing the resource you were trying to reach is forbidden"),
   @ApiResponse(code = 404, message = "The resource you were trying to reach is not found") })
 @GetMapping("/employees")
 public List getAllEmployees() {
  return employeeRepository.findAll();
 }

 @ApiOperation(value = "View a list of available employee details", response = List.class)
 @ApiResponses(value = { @ApiResponse(code = 200, message = "Successfully retrieved list"),
   @ApiResponse(code = 401, message = "You are not authorized to view the resource"),
   @ApiResponse(code = 403, message = "Accessing the resource you were trying to reach is forbidden"),
   @ApiResponse(code = 404, message = "The resource you were trying to reach is not found") })
 @GetMapping("/employeedetails")
 public List getAllEmployeeDetails() {
  return employeeDao.getEmployeeDetails();
 }

 @ApiOperation(value = "Get an employee by Id")
 @GetMapping("/employees/{id}")
 public ResponseEntity getEmployeeById(
   @ApiParam(value = "Employee id from which employee object will retrieve", required = true)
   @PathVariable(value = "id") Long employeeId)
   throws ResourceNotFoundException {
  Employee employee = employeeRepository.findById(employeeId)
    .orElseThrow(() -> new ResourceNotFoundException(EMPLOYEE_NOT_FOUND_FOR_THIS_ID + employeeId));
  return ResponseEntity.ok().body(employee);
 }

 @ApiOperation(value = "Add an employee")
 @PostMapping("/employees")
 public Employee createEmployee(
   @ApiParam(value = "Employee object store in database table", required = true)
   @Valid @RequestBody Employee employee) {
  return employeeRepository.save(employee);
 }

 @ApiOperation(value = "Update an employee")
 @PutMapping("/employees/{id}")
 public ResponseEntity updateEmployee(
   @ApiParam(value = "Employee Id to update employee object", required = true)
   @PathVariable(value = "id") Long employeeId,
   @ApiParam(value = "Update employee object", required = true)
   @Valid @RequestBody Employee employeeDetails) throws ResourceNotFoundException {
  Employee employee = employeeRepository.findById(employeeId)
    .orElseThrow(() -> new ResourceNotFoundException(EMPLOYEE_NOT_FOUND_FOR_THIS_ID + employeeId));

  employee.setName(employeeDetails.getName());
  employee.setAge(employeeDetails.getAge());
  final Employee updatedEmployee = employeeRepository.save(employee);
  return ResponseEntity.ok(updatedEmployee);
 }

 @ApiOperation(value = "Delete an employee")
 @DeleteMapping("/employees/{id}")
 public Map deleteEmployee(
   @ApiParam(value = "Employee Id from which employee object will delete from database table", required = true)
   @PathVariable(value = "id") Long employeeId)
   throws ResourceNotFoundException {
  Employee employee = employeeRepository.findById(employeeId)
    .orElseThrow(() -> new ResourceNotFoundException(EMPLOYEE_NOT_FOUND_FOR_THIS_ID + employeeId));

  employeeRepository.delete(employee);
  Map response = new HashMap<>();
  response.put("deleted", Boolean.TRUE);
  return response;
 }
}
Step 10: Once above code has been completed, then you can run the application by right clicking on the Springboot application.
Step 11. Once the application executed successfully, then we need to test this application
One way is either Using- SOAP UI, Postman - these needs to be installed on our machine, else we can't test the rest service.
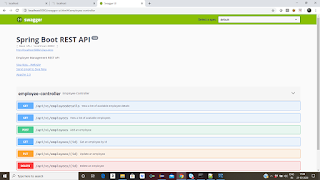
To test the REST API, we already configured Swagger UI. So just go to your web browser, then click,
http://localhost:8080/swagger-ui.html - it will display all the operations, which is availabe in controller class.
Now you can test those API's by giving request parameters
Step 12: Once done, we need to write Junit test cases for the all the classes
package com.siva.springboot.javaguruonline;

import org.junit.Test;
import org.junit.runner.RunWith;
import org.springframework.boot.test.context.SpringBootTest;
import org.springframework.test.context.junit4.SpringRunner;

@RunWith(SpringRunner.class)
@SpringBootTest
public class SpringbootJpaSwaggerSonarqubeApplicationTest {

 @Test
 public void contextLoads() {
 }

}
Controller class test
package com.siva.springboot.javaguruonline.controller;

import static org.hamcrest.Matchers.hasSize;
import static org.springframework.test.web.servlet.request.MockMvcRequestBuilders.get;
import static org.springframework.test.web.servlet.result.MockMvcResultMatchers.content;
import static org.springframework.test.web.servlet.result.MockMvcResultMatchers.jsonPath;
import static org.springframework.test.web.servlet.result.MockMvcResultMatchers.status;

import java.io.File;
import java.io.FileWriter;
import java.util.ArrayList;
import java.util.List;

import javax.annotation.meta.When;

import org.junit.Test;
import org.junit.runner.RunWith;
import org.mockito.Mock;
import org.springframework.beans.factory.annotation.Autowired;
import org.springframework.boot.test.autoconfigure.web.servlet.AutoConfigureMockMvc;
import org.springframework.boot.test.context.SpringBootTest;
import org.springframework.http.MediaType;
import org.springframework.test.context.junit4.SpringJUnit4ClassRunner;
import org.springframework.test.web.servlet.MockMvc;

import com.fasterxml.jackson.databind.ObjectMapper;
import com.siva.springboot.javaguruonline.SpringbootJpaSwaggerSonarqubeApplication;
import com.siva.springboot.javaguruonline.model.Employee;
import com.siva.springboot.javaguruonline.model.EmployeeDetails;
import com.siva.springboot.javaguruonline.repository.EmployeeDaoImpl;
import com.siva.springboot.javaguruonline.repository.EmployeeRepository;
import static org.mockito.Mockito.mock;
import static org.mockito.Mockito.when;

@RunWith(SpringJUnit4ClassRunner.class)
@SpringBootTest(webEnvironment = SpringBootTest.WebEnvironment.RANDOM_PORT,classes=SpringbootJpaSwaggerSonarqubeApplication.class)
@AutoConfigureMockMvc
public class EmployeeControllerTest {
 @Autowired
 private MockMvc mockMvc;

 @Autowired
 private EmployeeRepository employeeRepository;
 @Mock
 private EmployeeDaoImpl employeeDao;


 @Test
 public void testGetAllEmployees() throws Exception{
  List employeeList  = employeeRepository.findAll();
  ObjectMapper mapper = new ObjectMapper();
  String jsonString = mapper.writeValueAsString(employeeList);
  FileWriter file = new FileWriter(new File("employee.json"));
  file.write(jsonString);
  file.close();
  this.mockMvc.perform(get("/api/v1/employees")).andExpect(status().isOk()).andExpect(content().contentType(MediaType.APPLICATION_JSON_UTF8))
  .andExpect(jsonPath("$", hasSize(4)));

 }

 @Test
 public void testGetAllEmployeeDetails()  throws Exception {
  EmployeeDetails employee = new EmployeeDetails();
  employee.setEmpId(123);
  employee.setEmpName("Siva");
  List employeeList = new ArrayList();
  employeeList.add(employee);
  when(employeeDao.getEmployeeDetails()).thenReturn(employeeList);
  this.mockMvc.perform(get("/api/v1/employeedetails")).andExpect(status().isOk()).andExpect(content().contentType(MediaType.APPLICATION_JSON_UTF8))
  .andExpect(jsonPath("$", hasSize(4)));

 }

}
DaoImpl Test
package com.siva.springboot.javaguruonline.repository;

import java.util.List;

import org.junit.Assert;
import org.junit.Test;
import org.junit.runner.RunWith;
import org.springframework.beans.factory.annotation.Autowired;
import org.springframework.boot.test.context.SpringBootTest;
import org.springframework.test.context.junit4.SpringRunner;

import com.siva.springboot.javaguruonline.SpringbootJpaSwaggerSonarqubeApplication;
import com.siva.springboot.javaguruonline.model.EmployeeDetails;
import com.siva.springboot.javaguruonline.repository.EmployeeDao;
@RunWith(SpringRunner.class)
@SpringBootTest(classes = SpringbootJpaSwaggerSonarqubeApplication.class)
public class EmployeeDaoImplTest {

 @Autowired
 public EmployeeDao employeeDao;

 @Test
 public void testGetAllEmployeeDetails(){
  List employeeDetails = employeeDao.getEmployeeDetails();
  Assert.assertNotNull(employeeDetails);
 }

}
Repository Test
package com.siva.springboot.javaguruonline.repository;

import java.util.List;

import org.junit.Assert;
import org.junit.Test;
import org.junit.runner.RunWith;
import org.springframework.beans.factory.annotation.Autowired;
import org.springframework.boot.test.context.SpringBootTest;
import org.springframework.test.context.junit4.SpringRunner;

import com.siva.springboot.javaguruonline.SpringbootJpaSwaggerSonarqubeApplication;
import com.siva.springboot.javaguruonline.model.Employee;
import com.siva.springboot.javaguruonline.repository.EmployeeRepository;

@RunWith(SpringRunner.class)
@SpringBootTest(classes = SpringbootJpaSwaggerSonarqubeApplication.class)
public class EmployeeRepositoryTest {
 @Autowired
 EmployeeRepository employeeRepository;

 @Test
 public void getEmployeeDetails(){
  List employeeList = employeeRepository.findAll();
  Assert.assertNotNull("EmployeeListNotEmpty", employeeList);;
 }


}
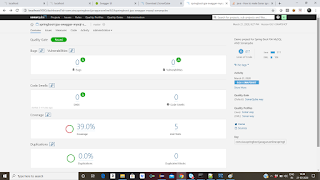
Step 13: We need to check the code coverage tool called Sonarqube, required dependencies added in
pom.xml
Step 14: Download Sonarqube from
SonarQube - and look for
Historical Downloads, then download , which ever the version you want to work on.
Step 15 : Unzip that file and go to bin folder-
StartSonar.bat file
Step 16 : Once Sonar is up, then go to browser and try
http://localhost:9000 , login with username -admin and password- admin
Step 17: Once Sonarqube is up and running, we need to run the code through either sonar scanner or maven
Before Scanning the code, we need to create properties file called -
sonar-project.properties place the inside of the your project
and need to mention src code path , test path, java version.. etc
# must be unique in a given SonarQube instance
sonar.projectKey=springboot-jpa-swagger-mysql-sonarqube
# this is the name displayed in the SonarQube UI
sonar.projectName=springboot-jpa-swagger-mysql-sonarqube
sonar.projectVersion=1.0


# Path is relative to the sonar-project.properties file. Replace "\" by "/" on Windows.
# Since SonarQube 4.2, this property is optional if sonar.modules is set.
# If not set, SonarQube starts looking for source code from the directory containing
# the sonar-project.properties file.
sonar.sources=/src/main/java/

# Encoding of the source code. Default is default system encoding
sonar.sourceEncoding=UTF-8

sonar.junit.reportPaths=./target/surefire-reports
# Generate sonar issues report in html and console
sonar.issuesReport.html.enable=true
sonar.issuesReport.console.enable=true

# Display Jacoco report into SonarQube dashboard
# Comma-separated paths to directories with tests (optional)
sonar.tests=/src/test/java/
# This name depends on the configuration in pom.xml. In this example we have ${project.build.directory}/coverage-reports/jacoco-ut.exec entry in our pom.xml
sonar.jacoco.reportPath=target/surefire-reports/jacoco-ut.exec
sonar.dynamicAnalysis=reuseReports
sonar.java.coveragePlugin=jacoco
sonar.jacoco.reportMissing.force.zero=true
sonar.java.binaries=/target/classes/
sonar.coverage.exclusions=**/*Employee.java,**/*EmployeeDetails.java,**/*ErrorDetails.java,**/*ErrorDetails.java,**/*ResourceNotFoundException.java
Step 18 : Use the below command to run the code coverage- make sure before running the sonar, sonarqube should up and running
Go to your project location in the command prompt.
/>mvn clean install sonar:sonar