Step 0: Java 1.7 or above needs to be installed.
Step1 : Download spring xd from below URL Spring XD
Step2: Unzip and place it where ever you desire. I have placed it in F:\softwares\spring-xd
Step3: Open command Prompt- go to F:\softwares\spring-xd\spring-xd-1.2.0.RELEASE\xd\bin
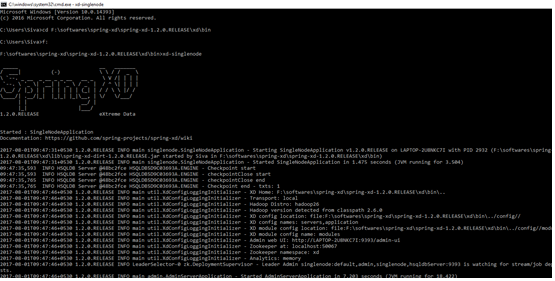
Step 4: F:\softwares\spring-xd\spring-xd-1.2.0.RELEASE\xd\bin>xd-singlenode
Spring xd will start and displayed as mentioned below.
Step 5: Now open another command prompt to run the shell- F:\softwares\spring-xd\spring-xd-1.2.0.RELEASE\shell\bin
Step 6: F:\softwares\spring-xd\spring-xd-1.2.0.RELEASE\shell\bin>xd-shell
Shell prompt will display as mentioned below.
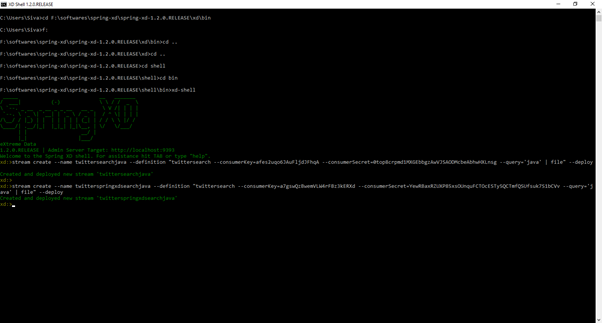
Step 7: Now we need to create twitter steam inside Spring XD shell
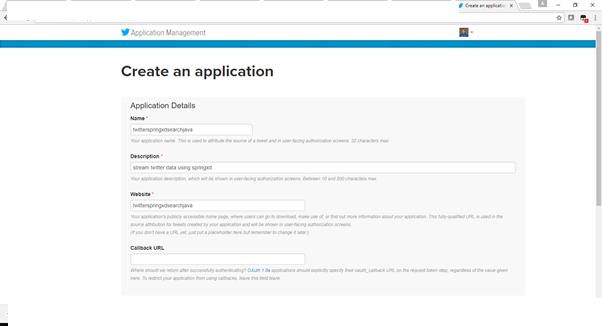
Step 8: We need to create an application inside twitter to get the consumer key and consumer secret key
Step 9: I have created application with name- twitterspringxdsearchjava.
Step 10: Please login into - https://apps.twitter.com and create your own application
Step 11: Now we need to run the created twitter application using spring xd shell
Step 12: output file created inside - F:\tmp\xd\output with name – twitterspringxdsearchjava.out
Step 13: This file will have live tweets data in json format.
Thank you very much for for viewing this post
Step1 : Download spring xd from below URL Spring XD
Step2: Unzip and place it where ever you desire. I have placed it in F:\softwares\spring-xd
Step3: Open command Prompt- go to F:\softwares\spring-xd\spring-xd-1.2.0.RELEASE\xd\bin
Step 4: F:\softwares\spring-xd\spring-xd-1.2.0.RELEASE\xd\bin>xd-singlenode
Spring xd will start and displayed as mentioned below.

Step 5: Now open another command prompt to run the shell- F:\softwares\spring-xd\spring-xd-1.2.0.RELEASE\shell\bin
Step 6: F:\softwares\spring-xd\spring-xd-1.2.0.RELEASE\shell\bin>xd-shell
Shell prompt will display as mentioned below.

Step 7: Now we need to create twitter steam inside Spring XD shell
Step 8: We need to create an application inside twitter to get the consumer key and consumer secret key
Step 9: I have created application with name- twitterspringxdsearchjava.
Step 10: Please login into - https://apps.twitter.com and create your own application

Step 11: Now we need to run the created twitter application using spring xd shell
Xd> stream create --name twitterspringxdsearchjava --definition "twittersearch --consumerKey=a7gswQzBwemVLW4rFBz3kERXd --consumerSecret=YewRBaxRZUXP85xsOUnquFCTOcESTy5QCTmfQSUfsuk7S1bCVv --query='java' | file" –deploy
Step 12: output file created inside - F:\tmp\xd\output with name – twitterspringxdsearchjava.out
Step 13: This file will have live tweets data in json format.
Thank you very much for for viewing this post