This post will explain you abou HBase Compactions, how to install HBase and start the Hbase, HBase Basic operations.
How to load data into HBase using sqoop.
HBase Compactions
1. HBase writes out immutable files as data is added
a). Each store consists rowkey-ordered files.
b).Immutable- more files accumulated over time.
2. Compaction rewrite several files into one
a).Lesser files – Faster reads
3. Major compaction rewrites all files in a store into one
a).Can drop deleted records and older versions
4. In a minor compaction, files to compact are selected based on a heuristic.
How to install HBase and start the same.
1. First download latest version HBase from
http://www.apache.org/dyn/closer.cgi/hbase/ or
https://hbase.apache.org/
2. Once Downloaded, then try to un tar the same.
3. tar –xvzf hbase-1.0.1.1-hadoop1-bin.tar.gz
4. Go to /usr/local/hbase/hbase-1.0.1.1/
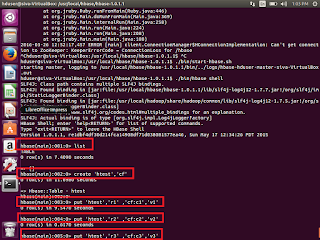
5. ./bin/start-hbase.sh
6. Once it is started , then
7. ./bin/hbase shell

We can see the shell window to work with. Try to enter list. It will show you list of existing tables.
If we are able to execute this command means our hbase started successfully without any issue.
Hbase>list
Now we will see sql operations through HBase.
HBase Basic operations
Create a table syntax
Create ‘table_name’ , ‘column_family’
HBase>Create ‘htest’,’cf’
Insert data
put ‘table_name’ ,’row_key1’,’column_family:columnname’,’v1’
Update data
put ‘table_name’ ,’row_key1’,’column_family:columnname’,’v2’
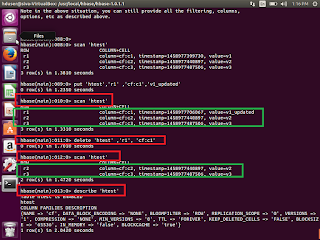
 Select few rows
get ‘table_name’ ,’row_key1’
Select whole table
scan ‘table_name’
Delete particular row value
delete ‘table_name’ ,’row_key1’,’column_family:columnname’
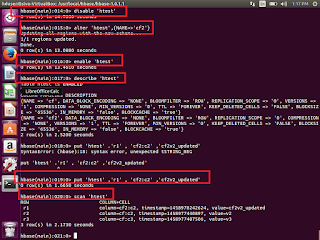
 Alter existing table
Before alter the table, first we need to disable the same table
disable ''
alter '' ,{NAME=''}
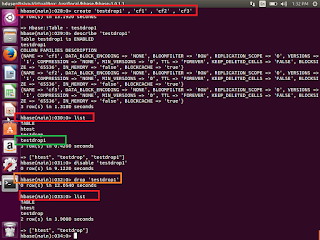
 Drop the table
First disable the existing table, which we supposed to be drop
Hbase>Disable  ‘testdrop1’
Hbase>drop  ‘testdrop1’
 How to create table from java and insert the data to the same in HBase table ?
First open eclipse-> create a new project ->class->HBaseTest.java
Copy and paste the below code. If any compilation errors then add the respective Hbase jars the same
Public class HBaseTest {
  Public static vaoid main(String args[]) throws  IO Exception{
 //We need Configuration object to tell the client where to connect.
//when we create a HBaseConfiguration , it reads whatever we have set into our hbase-site.xml, and //hbase-default.xml, as long as these can be found in the classpath
    Configuration config = HBaseConfiguration.create();
 //Instantiate HTable  object, that connects the testHBaseTable
//Create a table with name  testHBaseTable,  if it is not available.
   HTable table = new HTable(config,” testHBaseTable”);
//To Add a row use Put, Put constructor takes the name of the row which we want to insert into a //byte array, in HBase , the Bytes class has utility to converting all kinds of java types to byte arrays.
Put p = new Put(“testRow”);

//to set the value to row , we would like to update in the row testRow .
//Specify the column family. Column qualifier and value of the table.
//cell we would like to update then the column family must already exist.
//in our table schema the qualifier can be anything
//All must be specified as byte arrays as hbase is all about byte arrays.
p.add(Bytes.toBytes(“littleFamily”),Bytes.toBytes(“littleQualifier”),Bytes.toBytes(“little Value”));
//Once we have updated all the values for Put instance. Then HTable#put method takes Put instance  //we have building and pushes the change we made into HBase.
table.put(p);
//Now, to retrieve the data which we have just wrote the table;
Get   g = new Get(Bytes.toBytes(“testRow”)
Result   r = table.get(g);
byte [] value = r.getValue(Bytes.toBytes(“littleFamily”),Bytes.toBytes(“littleQualifier”));
String ValueString = Bytes.toString(value);
System.out.println(“GET:”+valueString);
//Some times we don’t know about row name, then we can use the scan to retrieve all the data from //the table
Scan s = new Scan();
s.addColumn(Bytes.toBytes(“littleFamily”), Bytes.toBytes(“littleQualifier”));
ResultScanner scanner = table.getScanner(s);
try{
   for (Result rr = scanner.next();rr!=null;rr=scanner.next()){
    System.out.println(“Found Row record:”+ rr);
  }
}
finally{
scanner.close();
}
 }
 }
Different ways to load the data into HBase
1. HBase Shell
2. Using Client API
3. Using PIG
4. Using SQOOP
How to load data into HBase using SQOOP?
Sqoop can be used directly import data from RDBMS to HBase.
First we need to install sqoop.
1. Download sqoop
http://www.apache.org/dyn/closer.lua/sqoop/1.4.6
2. Untar the Sqoop
tar -xvzf sqoop-1.4.6.bin__hadoop-0.23.tar.gz
3. Go upto bin. then run the executing below command.
sqoop import
               --connector jdbc:mysql://\
                --username  --password
                --table
                --hbase-table
                --column-family
                --hbase-row-key
                --hbase-create-table
This is how we will work with HBase.
Thank you very much for viewing this post.


